React Native Push Notifications
在 React Native 中的 Push Notifications
React Native 官方在 v0.13+ 之後支援 Push notifications 然而在這篇文章撰寫時仍然未實做完所有功能。
現階段只支援靜態的推播通知,另外關於錯誤處理的功能也還在開發中Error handling
React Native v0.12
對於上面的說法你可能有些疑問,事實會說在 0.13 支援是因為 0.12 的推播功能有些 Bug 不過在 0.13 時已經處理掉了。
其實 0.12 也可以用,這篇文章會包含如何修好該 Bug 的步驟。
步驟
為了要能夠在 React native 中使用推播通知的功能我們需要完成下面的步驟
- 匯入 Push Notification 函式庫
- 加入表頭檔路徑 (header path)
- 修改
AppDelegate.m - 建立憑證與開啟推播功能
- 撰寫程式碼完成功能
匯入函式庫
第一步我們要做的就是加入 PushNotificationIOS 函式庫。這一步在官方文件中已經說明得非常清楚了
你可以選擇看官方的或者下面的說明
- 使用 Xcode 開啟專案
- 在左邊檔案導覽區塊中展開 Library 目錄
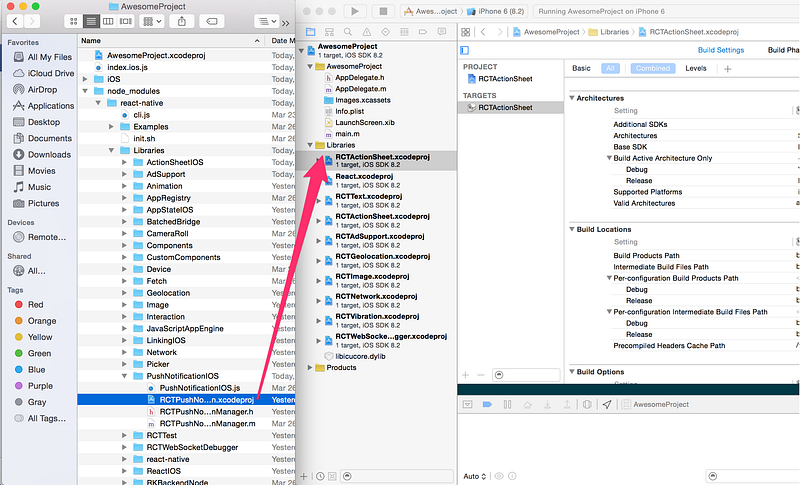
- 透過 Finder 開啟專案並且找到
node_modules/react-native/Libraries/PushNotificationIOS - 把這個
RCTPushNotification.xcodeproj拖到 Libraries 目錄下

現在這個函式庫已經被加入到專案中了,下一步我們需要連結 binary 檔案。
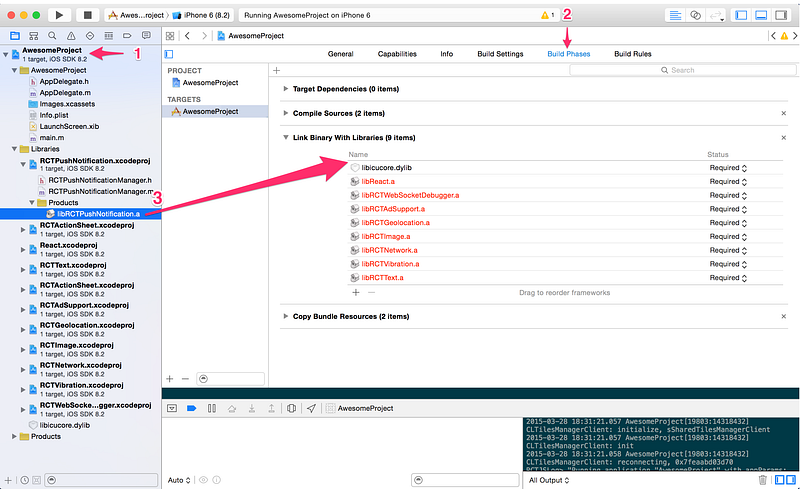
- 點擊左側導覽區中的專案檔如下圖 1 的地方然後切換到
Build Phases2

- 把
libRCTPushNotification.a拖到Link Binary With Libraries如上圖 3 處
對大部分的 React native 函式庫來說加入專案中並關聯就完成設定了。不過如果我們是要使用 PushNotification 函式庫我們還需要其他的設定
加入表頭檔路徑
到此函式庫已經被夾到專案中了,我們需要加入表頭檔路徑(Header Path)。這個步驟只有在當我們在編譯時需要用到函式庫內容才會需要做
例如 PushNotificationIOS 和 LinkingIOS 否則這個步驟是可以省略的。
要加入 Header Path 如下步驟
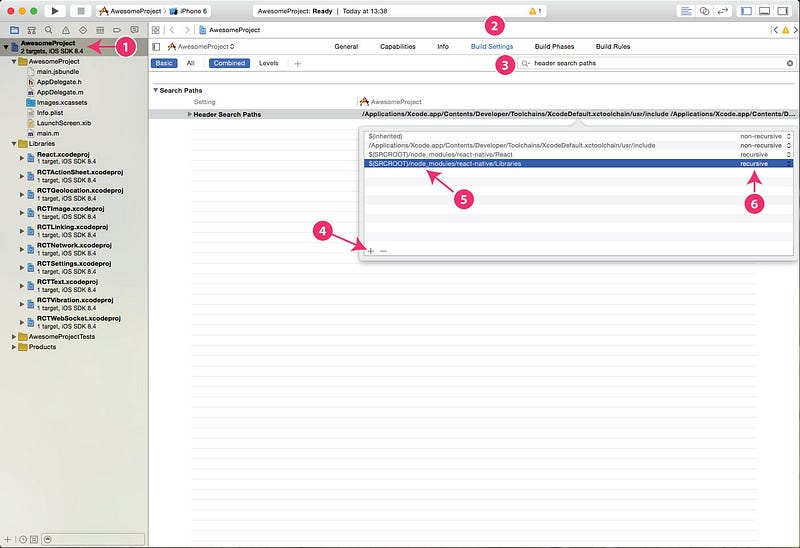
- 一樣點擊導覽區的專案如下圖 1 處
- 切換到
Build Settings圖 2 - 搜尋
header search paths如圖 3 Header Search Paths欄位的路徑上點擊兩下- 加入新的路徑如圖 4
- 取得該 Library 需要的檔案的路徑如圖 5
一般 React Native app 要填入的路徑 $(SRCROOT)/node_modules/react-native/Libraries
- 請確認一下該路徑後面是
recursive如圖 6

加入的 Header Search Path 的意義,在原生 Obj-C 這個路徑就是當我們要 import 函式庫時該去哪些路徑找檔案勒就像是 JS 中 require 預設的路徑是 node_modules
如此一來我們在 AppDelegate.m 匯入的時候才找得到檔案
修改 AppDelegate.m
這個 PushNotificationIOS 函式庫使用了一些 Obj-C 的方法來完成註冊與接收推播訊息。然而這些方法只能夠在 AppDelegate 中使用。
想想也很合理的,因為他是 Obj-C 的方法,因此我們需要加入一些程式碼將資料從 AppDelegate 傳到 PushNotificationIOS
- 第一步我們需要匯入
RCTPushNotificationManager.h到AppDelegate.m
1 |
- 第二件事我們需要加入幾行程式碼
1 | // Required for the register event. |
少了這幾行程式,資訊將無法被傳遞到 PushNotificationIOS
替 v0.12 修補 Bug
只有在專案使用的 React Native 版本是 0.12 或更早之前的才需要下面步驟
這是舊版的 Bug 他導致了在 iOS8 以後的手機系統無法正常推播,意味著 0.12 遇上最新的 iOS 會不正常。
下面的步驟則是修好這個 Bug
- 在 Xcode 中到
Library目錄下打開RCTPushNotification.xcodeproj/RCTPushNotificationManager.m - 捲到大概 155 行

如果你使用的是 v0.11 或更早的版本
- 換成下面這段程式碼

1 | UIApplication *app = [UIApplication sharedApplication]; |
如果使用的是 v0.12
- 換成下面的程式碼

1 | UIApplication *app = RCTSharedApplication(); |
- 存檔然後 Bug 就修復了
現在我們已經把 React native 專案需要的部分都處理好了,接下來要使用推託我們必須要取得憑證
憑證設定
也許你可能知道推播功能是透過 Apple 的 Server 傳到你的程式。並且為了讓功能能夠運作我們需要取得一些憑證
這部分 Parse 有提供一份非常詳細的教學
針對本文的部分只需要 step 1 Creating the SSL certificate 和 step 2 Creating the Provisioning Profile
一旦你完成這個步驟我們就可以開始使用推播功能了
使用推播功能
在 React native 中推播功能的 API 非常直覺。也可以透過官方的文件來學習。
概覽用法
首須我們需要在 Javascript 中匯入 PushNotificationIOS
1 | var { |
取得權限
在本機上要使用這個功能需要跟用戶要權限,要注意的是模擬器並不能夠使用推播必須要在實機上測試。
1 | PushNotificationIOS.requestPermissions(); |
註冊事件
當使用者註冊了接收遠端通知的時候會被觸發,透過這個事件可以取得裝置的 token
1 | PushNotificationIOS.addEventListener(‘register’, function(token){ |
通知事件
當收到推播通知的時候,繫結的函式會被觸發
1 | PushNotificationIOS.addEventListener(‘notification’, function(notification){ |
錯誤處理事件
在這個時間點你不會看到 PushNotificationIOS 產生任何錯誤。一般來說在 iOS 例如你的憑證失效時你應該會取得錯誤訊息
或者是在模擬器執行的時候,不過現階段這些錯誤都不會觸發
你可以持續關注Pull Request來看此功能是否被整合或者有其他更好的做法。
該如何傳送一個推播通知
為了要能夠發送推播我們會需要一個後端和憑證,這個部分我們有下面幾種做法
使用服務
採用外面的服務例如 Parse 或者 Urban Airship
建立自己的後端程式
憑證
過程中我們可能還需要一些憑證這個時候可以參考StackOverflow的解答
參考
React Native Push Notifications
https://andyyou.github.io/2015/12/08/how-to-use-push-notification-in-react-native/